great you'll pass in no time! yea i know what you mean about these timed levels. i feel frantic sometimes ahahaOriginally Posted by Phaedrakiki


great you'll pass in no time! yea i know what you mean about these timed levels. i feel frantic sometimes ahaha

Passed it (93 & 94, too!) Your tips as well as others in this thread are super helpful. 95 is a bit tricky, but I just almost passed --just 2 tiles left (ouch!) I'm gonna enjoy this level, though...'cause it sounds like 96 is going to hurt (hate doom jewels!) and take me awhile...
96 is really really hard. You just have to get lucky. a lot.
I got close earlier this week (2 blocks left) but I just cant seem to beat it. You have to get a quick start, be able to hold onto the diamonds until you see the first row of bombs, take them out and race forward. It is really demorlizing to get to the thru all the junk at the top and still have to work your way thru a bunch of layers to the bottom.
I've managed to take out the first row of bombs on 96 with a blaster but then I can never get down to see the next row. For me 91 was a beast. I got through the next four levels in a few days and I'm expecting 96 to be a ****er. Here's hoping for some luck.
Level 94: Break 62 glass in 70 moves (5JC-jewel colors used.) I replayed this level to get 3 stars, so I thought I'd add a photo/info. OmniBliss' reminder about using the gift boosts (blasters) with special jewels you've already made yourself is important, so I'm quoting it here. It can really expand the power of your gifts--you *only* get four. This level also has black jewels, kind of held in place by wooden walls, and "surprise" doom jewels that fall in occasionally. Here's a screenshot of the level as it is now (didn't get a pic back when I orig. played.):
The gift blasters (row/horizontal blasters) are especially awesome to use with bombs or diamonds you make yourself. To use one, just tap your finger on the boost's icon at the bottom right of the screen, then tap a jewel next to the special jewel you made. Then swap the two for powerful glass-breaking! These screenshots show a round I played where I had a reshuffle that moved the black jewels all over, where they got in the way. I made a bomb, and wanted to use it with one of the gift boosts in a combo. The blaster + bomb's T-shaped blast would be perfect to wipe out most of the black jewels, as well as some doom jewels, too.
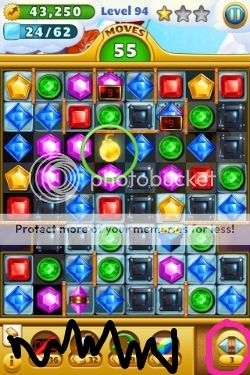
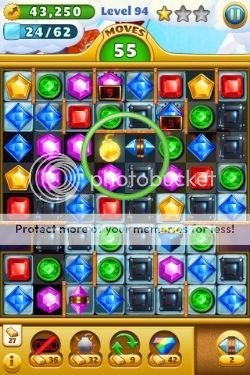
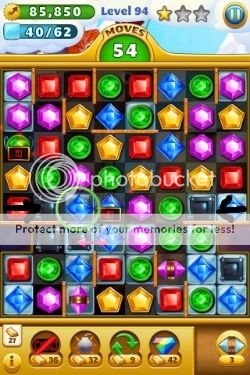
The 1st photo shows the yellow bomb (in a green circle) & the blaster boost icon (circled in pink at the bottom.) To use the boost, touch your finger to its icon, then press it to a jewel on the board. In the 2nd photo, you can see I chose the blue jewel to the right of the bomb. It's now a blue row/horiz. blaster (circled in green.) Then swap the blaster and bomb. The 3rd pic shows most of the black jewels gone in one move! You may also have noticed it blasted another gift, and added it to the boost icon at the bottom.
I'm also using the 3rd photo in a "for example." Say the T-blast left a few black jewels, and you wanted to get rid of some more. If you didn't have any bombs or diamonds for a "big" combo, you could still use a regular match to detonate. You could use one of your gift blaster boosts to change the green-circled blue jewel into a blue row blaster. Then you could make the swap designated with the red double arrow. It would take out the entire row (w/black arrows at the end.) You'd get rid of a doom jewel and two black jewels all at the same time.
Anyway, good luck! I know there are more difficult levels here in Pastry Plains (like 91 & 96) but I'm only 3-starring moves levels for now--my faves!
Lots of complaints about the difficulty of level 96. There's also some good advice:
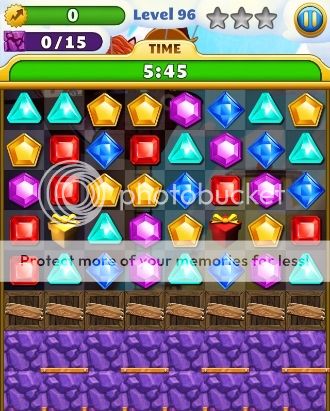
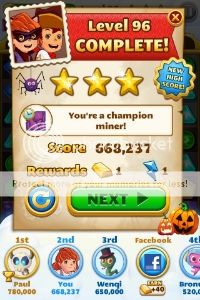
Level 96: Dig 15 meters in 5:45 (5JC.) I was looking at some of the quotes, talking about how difficult this was. I remember playing this a long time ago, and it was quite difficult--took a few days to pass. So I decided to try it again, and combine all the info about this level into one post (and see if I could get 3 stars in the process--only had 1.)
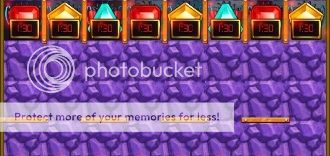
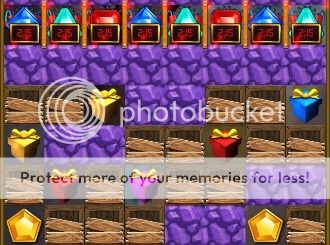
There are lots of doom jewels on this one, as well as wooden walls, crates, and gifts/presents. There's a row of crates right at the start line, which you'll have to bust through quickly to start digging. Then the doom jewels--there's a row of them with 1:30 on their timers at the 3-meter line, then another row of 'em at 7 meters (2:15 timers.) They have little walls between them, so you can't match them side-to-side. Luckily, they give you a couple of gifts to help--2 diamonds. You also get more gifts, after you get past the doom jewels (free bomb boosts.)
Use the diamonds to help clear the doom jewels, but don't combine a diamond + blaster--it takes too long for all the blasters to detonate. It's actually pretty easy to make diamonds and other special jewels on this level, so you might get even more diamonds (just swap with a doom-jewel colored jewel.) It's important to dig down quickly and clear them all...or your game is over. Once you've done that, you might want to follow the advice from bfflauren (see her quote above): pause the level and catch your breath after successfully clearing the doom jewels. My heart was about to pound out of my chest, so I tried this and it helped me calm down before moving on...
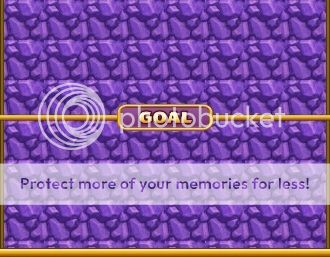
Now you're on to the next "phase" of the level...the race to the end. The free gift bombs are very helpful for digging, especially to get through the large group of crates towards the bottom. As mentioned in some of the other tips quoted above, you'll want to make your own blaster or diamond, then place a bomb next to it and swipe. The blaster + bomb will produce a 3 x 3 "+"-sign shaped blast, which is very powerful digging! Keep doing this: make blaster (or diamond,) add "free" bomb next to it (or below it, depending where it is,) then swipe. All the way to the finish line! Yay!Then you'll hopefully see something like this:
Good luck!
Very helpful thread. Was about to give up on this one but...darn it...will try again.
 Posting Permissions

 Reply With Quote